Search This Blog

Friday, December 9, 2011

Pumpkin Smoothie!!

Added by Ree on October 30, 2011 in Drinks, Smoothies
Servings 8Difficulty Easy

Ingredients

  • 1 can (15 Ounce) Pumpkin Pie Filling
  • 3 cups Whole Milk (more If Needed)
  • ½ cups Vanilla Yogurt (up To 1 Cup)
  • A Few Dashes Of Cinnamon
  • Cinnamon Graham Crackers, Crushed

Preparation Instructions

Well ahead of time, place pumpkin pie filling into a freezer-safe container. Freeze for a few hours or until frozen solid.
To make the smoothie, add milk, and yogurt to a blender. Drop in the frozen pumpkin pie filling and blend until the frozen filling is completely pulverized. Add more milk or yogurt as needed to get it the consistency you’d like.
Pour into individual glasses and sprinkle the tops with graham cracker crumbs. Serve immediately!
*Note: Make a lower-calorie smoothie by using unsweetened/unflavored pumpkin puree, nonfat plain yogurt, and the sweetener of your choice.
*Can also sprinkle with cinnamon and/or nutmeg instead of graham cracker crumbs

Wednesday, December 7, 2011

jingle bell bracelets

I think these are so cute, I am going to try these with my kids because it is so easy, sorry I did not have a picture of these but if you use the link you can watch a video on how to make these. So cute!!

These jingle bell bracelets will help your kids ring in the holiday season.
You'll need bells, beads, and wrist or ankle size pipe cleaners. To create a basic bracelet, just thread beads and bells on a wrist or ankle size pipe cleaner. We use the bumpy type here. Then form it into a circle and make a clasp by looping together the ends of the pipe cleaner. For a fancier look, thread on four or five bells, then coil additional pipe cleaners around the first between each bell. Finally, form it into a circle. For our even more elaborate version, start with a bumpy pipe cleaner threading one bell onto each bump. Form a single pipe cleaner into a circle, then twist the bumpy pipe cleaner around it so that each bell faces outward. These bracelets make the perfect gift for friends, teachers and family.

Tuesday, December 6, 2011

World’s Easiest Christmas Candy

http://moneysavingmom.com/2010/12/worlds-easiest-christmas-candy-recipe.html

World’s Easiest Christmas Candy

1 sleeve Saltine crackers
1 stick butter
1 cup brown sugar
2 cups chocolate chips
On a baking sheet, spread out Saltine crackers. Melt butter and brown sugar in a saucepan over medium heat until gooey. Pour over crackers and bake at 350 degrees for five minutes, or until bubbly.
Remove from oven and sprinkle chocolate chips on top. Let sit for a few minutes until chocolate chips begin to melt. Then, spread over crackers evenly with a spatula.
Stick in the freezer for an hour, or until chocolate hardens. Break into small pieces and put into gift containers or baggies. Store in the freezer until ready to eat or give away.


My mother in law makes this and it is sooo good...a favorite for sure!!

Warm and Yummy..White Chicken Chili from the Rachael Ray show!!

I have to say I really like chili.... I seen this recipe several years ago on the Rachael Ray show and tried it and loved it and so did my family.  My daughter Lily even ate it and she is picky.  I made this last night and it hot the spot, you should try it, it will warm you up and it is amazingly EASY!!

Mandi Forester’s White Chicken Chili

Ingredients

  • 1 32-ounce box chicken stock
  • 3 cans white beans, left undrained
  • 5 cups cooked chicken (rotisserie or boiled)
  • 1 16-ounce jar salsa
  • 1 8-ounce block pepper jack cheese, grated
  • 2 teaspoon ground cumin
  • 2 cloves garlic, minced
  • Black or white pepper to taste
  • 1/2 cup finely crushed corn chips (optional, if you like your chili thicker)
  • Sour cream, for garnish
Yields: 6 servings

Preparation

Place all ingredients except the corn chips in a crockpot. Cook on high until the cheese is melted.
Chili may also be cooked on the stovetop over medium-high heat until cheese is melted.
When the chili is ready, add the crushed corn chips, if using, and simmer for 10 minutes to thicken. Garnish with more chips, cheese and/or sour cream and serve.

Wonderful Five Layer Bars!!

I just love these bars, I had some over the weekend and they make me happy!! I like how you can do these up in a jar for a gift too.  It makes a great gift for a teacher or the mail delivery person... and your kids can help.  But most important they are good for you to eat all by yourself!!! Hope you enjoy!
Five Layer Bars
http://www.foodnetwork.com/food/cda/recipe_print/0,1946,FOOD_9936_278341_RECIPE-PRINT-FULL-PAGE-FORMATTER,00.html
Ingredients

Five Layer Bar Mix:

Directions

In a decorative jar, layer pecans, butterscotch morsels, coconut, and chocolate morsels. Spoon graham cracker crumbs into a small plastic or cellophane bag and place on top of the layers.

Preheat oven to 350 degrees F.

Remove graham cracker crumbs from jar. Combine graham cracker crumbs and melted butter. Press into bottom of a 9 by 13-inch baking dish. Sprinkle remaining ingredients of mix over crumb mixture. Pour sweetened condensed milk over the layers. Bake for 30 minutes. Allow to cool and cut into bars.


Tuesday, November 29, 2011

Hummingbird Cake... The best!!

I love love love this cake, it is one of my all time favorites.  my grandma used to make this cake and I loved it! I hope you enjoy!!
Hummingbird Cake

Cake                                                                             Frosting

3 cups flour                                                                             one 8 oz pkg cream cheese

2 cups granulated sugar                                                         1 stick butter - room temp

1 tsp baking soda                                                                    1 pound powdered sugar - sifted

1 tsp cinnamon                                                                       1 tsp vanilla extract   

1/2 tsp salt

3 eggs beaten

3/4 cup vegetable oil

1/34 cups mashed bananas

One 8 oz can crushed pineapple with juice

1 1/2 tsp vanilla

1 cup chopped pecans - optional


Preheat oven to 350 degrees. Grease and flour one 9 x13 inch pan or three 9 inch round pans. For the cake, in a mixing bowl, stir together the flour, sugar, baking soda, cinnamon, and salt. Add the eggs and oil and stir just until the dry ingredients are moistened. Do not beat.  Stir in the banana and pineapple and its juice, the pecans, and the vanilla. Pour the batter into prepared pan or pans and bake for 20 to 28 min, depending on the type of pans you are using.  Cool the cake completely.  While the cake cools, make the frosting:  in a bowl, blend together the cream cheese and butter.  Gradually add the confectioners' sugar, beating until light and fluffy.  Beat in the vanilla.  Frost the cake.


Red-nosed Reindeer Lollipops

I think these are too cute... I am going to make these with the kids this weekend and give some away to their friends, they love to do things like this, and the bonus is not a lot of mess...
http://familyfun.go.com/recipes/red-nosed-reindeer-lollipops-804099/


Red-nosed Reindeer Lollipops


With its lollipop head, pipe cleaner antlers, and googly eyes, this treat is part craft project, part holiday sweet. Kids can easily make a whole herd for classmates and teachers.

Ingredients

·      Large round lollipop

·      Plastic wrap

·      Clear and double-sided tapes

·      Brown pipe cleaner

·      Tiny bell

·      Red ribbon

·      Self-adhesive googly eyes

·      Red pom-pom

Instructions
1.      Unwrap the lollipop and cover it again with plastic wrap. Secure it at the base with clear tape. Bend the pipe cleaner in half around the base of the pop and shape the ends into antlers. Thread the bell onto a 10-inch length of red ribbon and tie it around the reindeer's neck. Stick on the googly eyes and attach the pom-pom nose with double-sided tape.


Potato Casserole

I made this with my leftover potatoes and it was wonderful, I thought I would share it!  Enjoy!

Potato Casserole


From Paula's Home Cooking/Savannah Country cookbook

Ingredients

8 tablespoon (1 stick) butter
1 small bell pepper, sliced thin
1 small onion, sliced thin
Paula Deen’s House Seasoning (to taste)
1/2 cup sour cream
2 cup mashed potatoes
1 1/2 cup grated Cheddar cheese
4 medium potatoes, cooked
6 slices of bacon, cooked crisp

Directions

Preheat oven to 350 degrees. Spread mashed potatoes evenly on bottom of casserole dish. Layer sour cream evenly over top. (Each time you add a layer, sprinkle on a little House seasoning.) Saute onion and bell pepper in butter; evenly layer over top of sour cream. Next, layer with 1/2 cup Cheddar cheese. Slice potatoes and layer over cheese until top is completely covered with potatoes. Finally top with remaining 1 cup cheese. Bake for 25-30 minutes. Remove from oven and crumble bacon over top.

Leftover mashed potatoes work wonderfully in this recipe.


Saturday, November 26, 2011

Yummy Turkey Tetrazzini

First let me start by saying I am sorry for being gone for a while... My husband has been off work and we have been working on projects..... So here is an awesome recipe for your leftover turkey!!! I made this and it is awesome. I am not really good as using up my leftovers so I am very proud of myself!! Hope you enjoy!!
Ingredients

  • 1-½ pound Thin Spaghetti, Broken In Half
  • 4 Tablespoons Butter
  • 4 cloves Garlic, Minced
  • 1 pound White Mushrooms, Quartered
  • ½ teaspoons Salt
  • 1 cup White Wine
  • ⅓ cups Flour
  • 4 cups Turkey (or Chicken) Broth
  • 1 block 8 Ounce Cream Cheese
  • 3 cups Cooked (leftover) Turkey, Shredded Or Diced
  • 1 cup Finely Chopped Black Olives
  • 1-½ cup Frozen Green Peas
  • 4 slices Bacon, Fried And Cut Into Bits
  • 1 cup Grated Monterey Jack Cheese
  • 1 cup Grated Parmesan Cheese
  • Salt And Pepper, to taste
  • Extra Broth For Thinning
  • 1 cup Panko Bread Crumbs

Preparation Instructions

Cook pasta until not quite done – al dente according to package instructions (it will finish cooking in the oven.) Drain, rinse, and set aside.

In a large pot, heat butter over medium-high heat. Add garlic and saute for a couple of minutes. Add mushrooms and salt, then saute for a couple more minutes. Pour in the wine and allow it to cook with the mushrooms for several minutes, or until the liquid reduces by half.

Sprinkle in flour, then stir the mushrooms around for another minute. Pour in the broth and stir, cooking for another few minutes until the roux thickens.

Reduce heat to medium low. Cut cream cheese into pieces and add it to the pot. Stir it to melt (don’t be concerned if the cream cheese remains in little bits for awhile; it’ll melt eventually!) Add the leftover turkey, the olives, the peas, the bacon, and the cheeses. Stir to combine, adding salt and pepper as needed.

Add the cooked spaghetti and stir it to combine. Splash in more broth as needed; you want the mixture to have a little extra moisture since it will cook off in the oven. If it’s a little soupy, that’s fine! Add up to 2 more cups of liquid if you think it needs it.

Pour the mixture into a large baking dish and sprinkle the top with Panko crumbs. Bake at 350 degrees F for 20 minutes, or until the casserole is bubbly and the crumbs are golden brown.


Thursday, November 10, 2011

Bake Sale: Maple Pecan Cupcakes

Bake Sale: Maple Pecan Cupcakes


By Stefani Pollack
Diving into these maple pecan cupcakes from the top, you’ll be met with butter pecan buttercream frosting that tastes exactly like butter pecan ice cream – so much so that you may be tempted to put it in a bowl and eat it with a spoon. That wouldn’t be a bad choice, but then you would miss out on discovering how well the butter pecan pairs with the pecan-packed maple cupcakes made with a half cup of pure maple syrup. Together, frosting and cupcake are pecan perfection!

Cupcake Ingredients:
1 ½ cups all-purpose flour
¾ cup finely crushed pecans
1 ½ teaspoons baking powder
½ teaspoon baking soda
½ teaspoon salt
½ cup sugar
½ cup pure maple syrup
½ cup unsalted butter, room temperature
2 large eggs, room temperature
½ teaspoon vanilla extract
2/3 cup whole milk
1 cup roughly chopped pecans
Cupcake Directions:
Preheat oven to 350 F.
In a medium-sized mixing bowl or bowl of a stand mixer, mix together flour, crushed pecans, baking powder, baking soda, and salt.
Mix in the sugar and maple syrup until fully combined.
Add the butter and mix on medium-low speed for three minutes.
Mix in the eggs and vanilla until just combined.
Mix in the milk until just combined.
Fold in the chopped pecans.
Bake for 20 minutes or until cupcakes bounce back when lightly touched.
Frosting Ingredients:
1 cup + 2 tablespoons unsalted butter, room temperature
1 cup roughly chopped pecans
Pinch salt
3 cups powdered sugar
1 tablespoon + 1 teaspoon vanilla extract
Frosting Directions:
To prepare the butter pecans, melt two tablespoons of butter in a small skillet over medium low heat.
Add pecans and salt to the skillet. Cook for six to eight minutes, stirring periodically, until almost all of the butter is absorbed. Remove from heat, but leave in the skillet.
To prepare the frosting, in a medium-sized mixing bowl or the bowl of a stand mixer, mix remaining one cup of butter on medium-low speed for three minutes or until light and fluffy.
Slowly mix in powdered sugar until fully combined.
Mix in vanilla until fully combined.
Scrape the cooled pecans and any butter left in the skillet into the frosting and fold in.
Spread onto cooled cupcakes.

Monday, November 7, 2011

Italian Beef

Here is an amazing recipe for Italian Beef!!! It is so good, you will be chopping at the bit for it to finish cooking in the crock pot.  It smells so amazing when it is cooking and it taste even better!! I got this recipe from my best friend Vanessa and I tell you it is a crowd pleaser!! Love it and you will too, I promise!! Just a side note ... it is my daughter's favorite, when I make it she always gives me a hug and thanks me, if that doesn't make you want to make this.. I don't know what will....

Italian Beef

3- 4 lbs. chuck roast                                                    1 Onion (Chopped)
2 pkgs. Good seasons Italian dressing mix                 1 ½ tsp garlic powder
2 cans Rotel diced tomatoes with green chili’s         a little salt & pepper
¼ cup water

Put chuck roast in crock pot and put all other ingredients in on top of chuck roast.  Put crock pot on low for 24 hrs.  If it is a smaller roast it may take only take 15 hours,  just keep checking on it. Stir roast until shredded.  Serve on buns or however you like.

Saturday, November 5, 2011

Cinnamon Roll Pancakes

I have made these and they are wonderful!! They are just perfect without the glaze, but if you have a sweet tooth be sure to make it!! This is a great Saturday morning or Sunday morning treat!

http://www.recipegirl.com/2011/03/01/cinnamon-roll-pancakes/

Cinnamon Roll Pancakes

An absolutely decadent morning treat...

Ingredients:

PANCAKES:
1 cup all-purpose flour
2 teaspoons baking powder
1/2 teaspoon salt
1 cup milk
1 Tablespoon canola oil
1 large egg, lightly beaten
CINNAMON FILLING:
1/2 cup butter, melted
3/4 cup brown sugar, packed
1 Tablespoon ground cinnamon
CREAM CHEESE GLAZE:
4 Tablespoons butter
2 ounces cream cheese
3/4 cup powdered sugar
1/2 teaspoon vanilla extract

Directions:

1. Prepare pancake batter: In a medium bowl, whisk together flour, baking powder and salt. Whisk in milk, oil and egg, just until batter is moistened (a few small lumps are fine).
2. In a medium bowl, mix butter, brown sugar and cinnamon. Scoop the filling into a small zip baggie and set aside. You don't want this to remain super-liquidy. It's best if it becomes a consistency similar to toothpaste.
3. In a medium, microwave-safe bowl- heat butter and cream cheese until melted. Whisk together until smooth; whisk in powdered sugar and vanilla extract; set aside.
4. Heat large skillet over medium-low heat. Spray with nonstick spray. Scoop about 3/4 cup batter onto the skillet. Snip the corner of your baggie of filling and squeeze a spiral of the filling onto the top of the pancake. When bubbles begin to appear on the surface, flip carefully with a thin spatula, and cook until browned on the underside, 1 to 2 minutes more. Transfer to a baking sheet or platter and keep in a warm oven until ready to serve.
5. When ready to serve, spoon warmed glaze onto the top of each pancake.

Tips:

*Keep the heat low or your pancakes might cook up too quickly. Don't flip them until you see those bubbles starting to pop on top. Flip them with a wide spatula so you can grasp the whole thing without batter and filling dripping all over the place!
*It's best if you pour the batter onto your skillet, wait a minute or so and then swirl the cinnamon onto the batter. That'll give it a chance to set a little before you add the swirl.
*If your baggie of filling begins to get too thick, just pop it in the microwave for a few seconds to soften it up again. On that same note, it shouldn't be too runny. The consistency of soft toothpaste is perfect. If it's melty and runny, it will tend to run all over your pancakes. Once you micro it, let it sit on the counter at room temp for a while until it thickens slightly.

Wednesday, November 2, 2011

You have to see this!!!

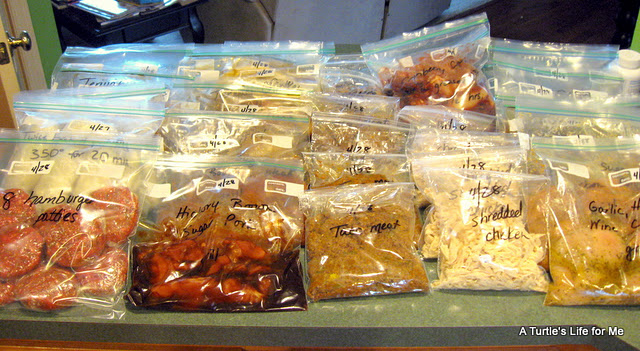
I wanted you all to see this article that has inspired me to do more freezer cooking.  I hope I stay inspired...just saying.  I think this is such a good idea especially with all of the busy days coming during the holidays, I think this would really help!! Please go to her site and read her thought process behind this. I found a lot of great tips!!

Football Food Freezer Cooking Frenzy

by Crystal on November 2, 2011

Remember when I posted about the gal who made 46 freezer meals in four hours for a total of $95? Well, not only did I get to meet this amazing woman at the Harrisburg Reader Meet-up, but she also told me that she’d recently posted about her Football Food Freezer Cooking Frenzy.
Head over and read how she made a bunch of Football Food for her Freezer in just a matter of a few hours. I promise you’ll be inspired!

Fall Leaf Collection Project for Kids!!!

     I was looking for a craft or something to do with my 8 yr old as well as my 3yr old and 1 yr old. I wanted to do something that involved the different types of leafs and tree's.  I stumbled across this today and I am going to try to do this tonight or tomorrow. I think it will be a lot of fun and it is something we can start to do for a fall tradition.  I hope you try it too!! Here is the link to nick jr's website.

Tuesday, November 1, 2011

M&M Holiday Pretzel Treats

I make these every year and they are addicting!! You will love them. You also can change them up season to season by changing the M&M's. I am using the fall ones right now.  Love it!!!!

Holiday Pretzel Treats

From FamilyFun Magazine
    Holiday Pretzel Treats

    Salty pretzels combine with sweet chocolate for these fun treats that make a yummy gift few can resist. (In fact, you may want to make some extras for yourself!)

    Ingredients

    • Bite-size, waffle-shaped pretzels
    • Hershey's Kiss or Hershey's Hug
    • M&M's candy

    Instructions
    1. Heat the oven to 170F. Set a number of bite-size, waffle-shaped pretzels (one for each treat) in a single layer on a cookie sheet lined with parchment paper, then top each pretzel with an unwrapped Hershey's Kiss or Hershey's Hug.
    2. Bake for 4 to 6 minutes (the white chocolate will melt more quickly), until the chocolates feel soft when touched with a wooden spoon. Remove the cookie sheet from the oven and quickly press an M&M's candy into the center of each Kiss.
    3. Allow the treats to cool for a few minutes, then place them in the refrigerator to set, about 10 minutes. Place handfuls of the candies in clear plastic bags and tie on colorful ribbons.

    Homemade Slime


    I found this recipe online and tried it out to see if it works and it did!  I am making this tonight with the kids.... should be fun!!!

     
    Homemade Slime aka GAK

    1 teaspoon borax powder
    1 1/2 C water, divided
    4 oz (1/2 C) Elmer’s glue, clear or white
    food coloring
    Add borax powder to 1 cup of water and stir to dissolve. Set aside. Pour glue into a medium mixing bowl and add 1/2 C water. Add a few drops of food coloring until desired color is reached and then stir to mix glue solution until smooth. Pour the borax mixture into the glue mixture and watch the solids start to form. Stir for a few moments and then use your hands to gather the mass. The mixture will be very soft and wet. Keep kneading until it firms up and feels dry. Discard excess liquid in bowl. The more you knead and play with the slime the firmer it will become. Store in a ziplock bag or air tight container and the slime will keep indefinitely.

    Monday, October 31, 2011

    Pumpkin Cheesecake!

     Pumpkin Cheesecake!!   


    I had a request for a recipe today for Pumpkin Cheesecake.... so here it is. This is the recipe that I use every year around this time.  I love love love it.  I am a huge cheesecake fan!  I do use the water bath method when cooking this. I hope you enjoy and Happy Halloween!!!

    Ingredients

    Crust:

    • 1 3/4 cups graham cracker crumbs
    • 3 tablespoons light brown sugar
    • 1/2 teaspoon ground cinnamon
    • 1 stick melted salted butter

    Filling:

    • 3 (8-ounce) packages cream cheese, at room temperature
    • 1 (15-ounce) can pureed pumpkin
    • 3 eggs plus 1 egg yolk
    • 1/4 cup sour cream
    • 1 1/2 cups sugar
    • 1/2 teaspoon ground cinnamon
    • 1/8 teaspoon fresh ground nutmeg
    • 1/8 teaspoon ground cloves
    • 2 tablespoon all-purpose flour
    • 1 teaspoon vanilla extract

    Directions

    Preheat oven to 350 degrees F.

    For crust:
    In medium bowl, combine crumbs, sugar and cinnamon. Add melted butter. Press down flat into a 9-inch springform pan. Set aside.

    For filling:
    Beat cream cheese until smooth. Add pumpkin puree, eggs, egg yolk, sour cream, sugar and the spices. Add flour and vanilla. Beat together until well combined.

    Pour into crust. Spread out evenly and place oven for 1 hour. Remove from the oven and let sit for 15 minutes. Cover with plastic wrap and refrigerate for 4 hours.

    Frito Chili Pie... need I say more....


    Frito Chili Pie

    Ingredients

    • 2 pounds Ground Chuck
    • 3 cloves Garlic, Minced (optional)
    • 1 can (12 To 14 Ounce) Tomato Sauce
    • 1 can (10 Ounce) Ro-tel (diced Tomatoes And Chilies)
    • ½ teaspoons Salt
    • 1 teaspoon Ground Oregano
    • 1 Tablespoon Ground Cumin
    • 2 Tablespoons Chili Powder (more To Taste)
    • 1 can (14-ounce) Kidney Beans, Drained And Rinsed
    • 1 can (14-ounce) Pinto Beans, Drained And Rinsed
    • ¼ cups Masa (corn Flour) Or Regular Corn Meal
    • ½ cups Warm Water
    • Individual Bags Of Fritos
    • Grated Sharp Cheddar Cheese
    • Diced Red Onion (Optional)

    Preparation Instructions

    Brown ground chuck with garlic in a pot over medium-high heat. Add tomato sauce, Rotel, salt, oregano, cumin, and chili powder. Cover and reduce heat to low. Simmer for 30 minutes.
    Add drained and rinsed beans. Stir to combine, then cover and simmer for another 20 minutes.
    Mix masa with water, then add to the chili. Stir to combine and simmer for a final 10 to 15 minutes. Set aside.
    Serve by slicing the Frito bags open lengthwise. Pile in chili and cheese, and diced onion if using. Serve immediately with plastic forks. A crowd-pleaser!

    Friday, October 28, 2011

    Creamy Hash Brown Casserole!!

    This is a recipe that is so simple and yummy.  I make this sometimes as a side dish for dinner and sometimes I put some sausage in it or bacon or smoky links and make it for breakfast.  I also use Ritz crackers finely crumbled on top too!  Enjoy! 


    Creamy Hash Brown Casserole

    Creamy Hash Brown Casserole

    Ingredients

    1/4 cup butter, plus more for dish
    1 onion, chopped
    1 (16-ounce) container sour cream
    1 (10 1/2-ounce) can cream of celery soup
    1 (8-ounce) package shredded Cheddar and Monterey Jack cheese blend
    1/2 teaspoon garlic powder
    1 (30-ounce) package frozen shredded hash brown potatoes, thawed
    1 teaspoon salt
    1/2 teaspoon ground black pepper
    2 cups crushed potato chips

    Directions

    Preheat oven to 350 degrees F. Lightly butter a casserole dish.
    In a small skillet, melt 1/4 cup of butter over medium heat. Add onion, and cook 3 to 4 minutes, or until soft. Pour mixture into a large bowl. Add the sour cream, cream of celery soup, cheese, garlic powder, hash browns, and salt and pepper. Combine until well blended.
    Pour mixture into prepared baking dish. Top evenly with crushed potato chips and bake for 45 minutes, or until hot and bubbly.

    Spider Bites

    I seen this recipe today and tried it with my son this morning. These are so stinking cute and great for Halloween.  It was so easy to make and my son had a blast!  Enjoy!

    Spider Bites

    Recipe courtesy Sandra Lee, 2007


    Ingredients

    Directions

    Place parchment paper on baking sheet; set aside.
    In a large glass microwave-safe bowl combine chocolate chips and peanut butter. Melt on high for 2 to 3 minutes. Remove and stir until smooth.
    Stir in pretzel sticks. With clean hands grab pretzel sticks and drop on prepared baking sheet in clusters to look like spiders.
    Place in freezer for 5 minutes or until to chocolate is hardened. Remove and serve.

    Thursday, October 27, 2011

    Restaurant Rescue: Eat Out with Kids Without Losing Your Mind

    One funny tip I have is ask for your to-go box and bill when you get your food just in case you need to make a quick dash out of there. Adam and I have to do that all the time, with a 8yr old, 3yr old and a 15 month old we are prepared to flee at anytime.  I also try to make sure they do not get out of their seat and if they do we are in for it because it is hard to get them back in it.  I do also try to take some toys in the diaper bag that I get at the dollar store for them to play with, you just have to make sure it is something they want to play with and are not bored with already.If you have any tips leave a comment to share, I would love to hear them!!


    Restaurant Rescue: Eat Out with Kids Without Losing Your Mind

    From our provider: SheKnows

    Kids in Restaurants


    You've come to the restaurant to enjoy a pleasant meal outside the confines of your own kitchen. But the experience is marred by the table of what you can only describe as wild animals recently escaped from a nearby zoo. The children grab food with their hands, leave their chairs repeatedly, bicker, spill, and, well, you can't even bear to watch anymore.

    And these are your children!

    We've all been there, stuck in a very public place, watching in horror as our kids go crazy for everyone to see -- and criticize. But you can actually have an enjoyable restaurant experience with your kids, if you do just a little advance planning.

    Insist on good manners at home: You can't expect kids to differentiate between situations the way adults do. So if dinner is a free-for-all at home, that's what they'll expect -- and do -- when you eat out. Teach kids to sit at the table, use indoor voices, and follow other basic rules.

    Of course, you also need to bear in mind that kids are not small adults -- they're kids. So they're not going to sit quietly through a seven-course banquet. Set reasonable expectations for mealtime behavior -- but be firm about those expectations.

    Set yourself up for success: In general, this is a cornerstone of good parenting. Don't take your toddlers to the kind of restaurant where meals take hours and a dropped fork brings a glare from other patrons. Don't expect them to feel at home with ethnic food they've never experienced if they won't eat anything more exciting than PB&J at home.

    Choose a family-friendly restaurant with a decent selection of kids' meals. And here's a tip learned from a mom of 10 children: Discuss choices with your kids before you leave the house and call in their orders. That way, when you walk in and sit down, their food will be ready in moments, and they can dig in. If you and your spouse can also pre-order, even better. You can have a restaurant experience and be out the door before the meltdowns begin.

    Bring along a coloring book and some crayons to keep kids occupied at the table. Do not make the mistake of bringing a bagful of toys and games, though -- things will be thrown, lost, or soiled in moments.

    Eat at off times: Don't walk into the dinner rush with your easily over-stimulated child. Aim for quieter times when you'll have a little more room and a little less pressure. A weekend brunch or a late lunch can be a better restaurant experience than an end-of-the day dinner when kids are bound to be tired and cranky.

    Reward your server: If your pre-ordered meals are ready when you arrive and your server helps make your experience as pleasant as possible, thank him or her and tip generously. If, despite everyone's best efforts, your kids aren't cooperating, it's not the waiter's fault. Apologize sincerely, thank him or her, and tip generously.

    Eating out with kids can be a great experience. You'll get better with practice, and before long you'll find yourself beaming when someone compliments you on your well-behaved children.

    Chicken Nuggets with Honey Mustard Dipping Sauce

    Ok ..... This is one of the most requested and loved things I make and take to family gatherings!  People eat them up. I ALWAYS double the recipe because people truly do LOVE them that much. I am postive that you will love them and so will everyone else! They are good to make for dinner too, kids love them and they are so much better for them than the process nuggets. Enjoy!!


    Chicken Nuggets with Honey Mustard Dipping Sauce


    Ingredients

    1/3 cup butter
    6 Chicken breast fillets, cut into 1 1/2-inch cubes
    2 cups crushed sour-cream-and-onion-flavored potato chips
    2 tablespoons milk
    1 egg
    Honey Mustard:
    3/4 cup mayonnaise
    3 tablespoons honey
    2 tablespoons yellow mustard
    1 tablespoon lemon juice or juice from 1/2 lemon
    Horseradish, to taste
    2 tablespoons orange juice (more or less as needed)

    Directions

    Preheat the oven to 350 degrees. Spread the crushed potato chips in a shallow dish. Beat together the egg and milk in a shallow bowl. Dip the chicken cubes into the egg mixture and then dredge them in the chips. Place the chicken nuggets on a baking sheet and drizzle with melted butter. Bake for 15 to 18 minutes, or until golden brown. The chicken nuggets can be frozen after baking. Serve with your favorite sauce, such as honey mustard or ranch dressing.

    Wednesday, October 26, 2011

    Yummy Pizza Casserole!!

    This is a great recipe for the family. It is a quick recipe to make and if you are in a real hurry pick up a bag of the fully cooked sausage crumbles. My whole family loves this and I just normally make some breadsticks and a salad to go along side it. Enjoy!!


    Pizza Casserole

    ·         3 Cups uncooked ziti noodles
    ·         1 lb. sausage
    ·         1 onion chopped
    ·         1 green pepper chopped
    ·         5 garlic cloves, minced
    ·         2 (15 oz) cans tomato sauce
    ·         1(14.5 oz) can diced tomatoes with basil, garlic, oregano
    ·         1 (3oz) pkg pepperoni
    ·         1 small can of mushrooms (optional)
    ·         1 tbsp dried parsley
    ·         1 tsp dried oregano
    ·         ½ tsp salt
    ·         ½ tsp ground black pepper
    ·         2 ½ cups shredded mozzarella cheese
         Cook pasta according to package direction, drain and set aside. Preheat oven to 350 degrees. Lightly grease a 9 X13 pan. In a large skillet, cook sausage, onion, green pepper over medium heat until sausage is browned and crumbly, the last minute or so of cooking add the garlic careful not to burn. Then drain the excess grease. Spoon sausage mixture into a large bowl, stir in tomato sauce, tomatoes, pepperoni, mushrooms, parsley, oregano, salt and pepper. Stir in one cup of the mozzarella cheese.  Add cooked pasta, tossing to combine. Spoon mixture into baking dish and top with remaining cheese. Bake for 30 -40 minutes until hot and bubbly.