Search This Blog

Tuesday, November 29, 2011

Hummingbird Cake... The best!!

I love love love this cake, it is one of my all time favorites.  my grandma used to make this cake and I loved it! I hope you enjoy!!
Hummingbird Cake

Cake                                                                             Frosting

3 cups flour                                                                             one 8 oz pkg cream cheese

2 cups granulated sugar                                                         1 stick butter - room temp

1 tsp baking soda                                                                    1 pound powdered sugar - sifted

1 tsp cinnamon                                                                       1 tsp vanilla extract   

1/2 tsp salt

3 eggs beaten

3/4 cup vegetable oil

1/34 cups mashed bananas

One 8 oz can crushed pineapple with juice

1 1/2 tsp vanilla

1 cup chopped pecans - optional


Preheat oven to 350 degrees. Grease and flour one 9 x13 inch pan or three 9 inch round pans. For the cake, in a mixing bowl, stir together the flour, sugar, baking soda, cinnamon, and salt. Add the eggs and oil and stir just until the dry ingredients are moistened. Do not beat.  Stir in the banana and pineapple and its juice, the pecans, and the vanilla. Pour the batter into prepared pan or pans and bake for 20 to 28 min, depending on the type of pans you are using.  Cool the cake completely.  While the cake cools, make the frosting:  in a bowl, blend together the cream cheese and butter.  Gradually add the confectioners' sugar, beating until light and fluffy.  Beat in the vanilla.  Frost the cake.


Red-nosed Reindeer Lollipops

I think these are too cute... I am going to make these with the kids this weekend and give some away to their friends, they love to do things like this, and the bonus is not a lot of mess...
http://familyfun.go.com/recipes/red-nosed-reindeer-lollipops-804099/


Red-nosed Reindeer Lollipops


With its lollipop head, pipe cleaner antlers, and googly eyes, this treat is part craft project, part holiday sweet. Kids can easily make a whole herd for classmates and teachers.

Ingredients

·      Large round lollipop

·      Plastic wrap

·      Clear and double-sided tapes

·      Brown pipe cleaner

·      Tiny bell

·      Red ribbon

·      Self-adhesive googly eyes

·      Red pom-pom

Instructions
1.      Unwrap the lollipop and cover it again with plastic wrap. Secure it at the base with clear tape. Bend the pipe cleaner in half around the base of the pop and shape the ends into antlers. Thread the bell onto a 10-inch length of red ribbon and tie it around the reindeer's neck. Stick on the googly eyes and attach the pom-pom nose with double-sided tape.


Potato Casserole

I made this with my leftover potatoes and it was wonderful, I thought I would share it!  Enjoy!

Potato Casserole


From Paula's Home Cooking/Savannah Country cookbook

Ingredients

8 tablespoon (1 stick) butter
1 small bell pepper, sliced thin
1 small onion, sliced thin
Paula Deen’s House Seasoning (to taste)
1/2 cup sour cream
2 cup mashed potatoes
1 1/2 cup grated Cheddar cheese
4 medium potatoes, cooked
6 slices of bacon, cooked crisp

Directions

Preheat oven to 350 degrees. Spread mashed potatoes evenly on bottom of casserole dish. Layer sour cream evenly over top. (Each time you add a layer, sprinkle on a little House seasoning.) Saute onion and bell pepper in butter; evenly layer over top of sour cream. Next, layer with 1/2 cup Cheddar cheese. Slice potatoes and layer over cheese until top is completely covered with potatoes. Finally top with remaining 1 cup cheese. Bake for 25-30 minutes. Remove from oven and crumble bacon over top.

Leftover mashed potatoes work wonderfully in this recipe.


Saturday, November 26, 2011

Yummy Turkey Tetrazzini

First let me start by saying I am sorry for being gone for a while... My husband has been off work and we have been working on projects..... So here is an awesome recipe for your leftover turkey!!! I made this and it is awesome. I am not really good as using up my leftovers so I am very proud of myself!! Hope you enjoy!!
Ingredients

  • 1-½ pound Thin Spaghetti, Broken In Half
  • 4 Tablespoons Butter
  • 4 cloves Garlic, Minced
  • 1 pound White Mushrooms, Quartered
  • ½ teaspoons Salt
  • 1 cup White Wine
  • ⅓ cups Flour
  • 4 cups Turkey (or Chicken) Broth
  • 1 block 8 Ounce Cream Cheese
  • 3 cups Cooked (leftover) Turkey, Shredded Or Diced
  • 1 cup Finely Chopped Black Olives
  • 1-½ cup Frozen Green Peas
  • 4 slices Bacon, Fried And Cut Into Bits
  • 1 cup Grated Monterey Jack Cheese
  • 1 cup Grated Parmesan Cheese
  • Salt And Pepper, to taste
  • Extra Broth For Thinning
  • 1 cup Panko Bread Crumbs

Preparation Instructions

Cook pasta until not quite done – al dente according to package instructions (it will finish cooking in the oven.) Drain, rinse, and set aside.

In a large pot, heat butter over medium-high heat. Add garlic and saute for a couple of minutes. Add mushrooms and salt, then saute for a couple more minutes. Pour in the wine and allow it to cook with the mushrooms for several minutes, or until the liquid reduces by half.

Sprinkle in flour, then stir the mushrooms around for another minute. Pour in the broth and stir, cooking for another few minutes until the roux thickens.

Reduce heat to medium low. Cut cream cheese into pieces and add it to the pot. Stir it to melt (don’t be concerned if the cream cheese remains in little bits for awhile; it’ll melt eventually!) Add the leftover turkey, the olives, the peas, the bacon, and the cheeses. Stir to combine, adding salt and pepper as needed.

Add the cooked spaghetti and stir it to combine. Splash in more broth as needed; you want the mixture to have a little extra moisture since it will cook off in the oven. If it’s a little soupy, that’s fine! Add up to 2 more cups of liquid if you think it needs it.

Pour the mixture into a large baking dish and sprinkle the top with Panko crumbs. Bake at 350 degrees F for 20 minutes, or until the casserole is bubbly and the crumbs are golden brown.


Thursday, November 10, 2011

Bake Sale: Maple Pecan Cupcakes

Bake Sale: Maple Pecan Cupcakes


By Stefani Pollack
Diving into these maple pecan cupcakes from the top, you’ll be met with butter pecan buttercream frosting that tastes exactly like butter pecan ice cream – so much so that you may be tempted to put it in a bowl and eat it with a spoon. That wouldn’t be a bad choice, but then you would miss out on discovering how well the butter pecan pairs with the pecan-packed maple cupcakes made with a half cup of pure maple syrup. Together, frosting and cupcake are pecan perfection!

Cupcake Ingredients:
1 ½ cups all-purpose flour
¾ cup finely crushed pecans
1 ½ teaspoons baking powder
½ teaspoon baking soda
½ teaspoon salt
½ cup sugar
½ cup pure maple syrup
½ cup unsalted butter, room temperature
2 large eggs, room temperature
½ teaspoon vanilla extract
2/3 cup whole milk
1 cup roughly chopped pecans
Cupcake Directions:
Preheat oven to 350 F.
In a medium-sized mixing bowl or bowl of a stand mixer, mix together flour, crushed pecans, baking powder, baking soda, and salt.
Mix in the sugar and maple syrup until fully combined.
Add the butter and mix on medium-low speed for three minutes.
Mix in the eggs and vanilla until just combined.
Mix in the milk until just combined.
Fold in the chopped pecans.
Bake for 20 minutes or until cupcakes bounce back when lightly touched.
Frosting Ingredients:
1 cup + 2 tablespoons unsalted butter, room temperature
1 cup roughly chopped pecans
Pinch salt
3 cups powdered sugar
1 tablespoon + 1 teaspoon vanilla extract
Frosting Directions:
To prepare the butter pecans, melt two tablespoons of butter in a small skillet over medium low heat.
Add pecans and salt to the skillet. Cook for six to eight minutes, stirring periodically, until almost all of the butter is absorbed. Remove from heat, but leave in the skillet.
To prepare the frosting, in a medium-sized mixing bowl or the bowl of a stand mixer, mix remaining one cup of butter on medium-low speed for three minutes or until light and fluffy.
Slowly mix in powdered sugar until fully combined.
Mix in vanilla until fully combined.
Scrape the cooled pecans and any butter left in the skillet into the frosting and fold in.
Spread onto cooled cupcakes.

Monday, November 7, 2011

Italian Beef

Here is an amazing recipe for Italian Beef!!! It is so good, you will be chopping at the bit for it to finish cooking in the crock pot.  It smells so amazing when it is cooking and it taste even better!! I got this recipe from my best friend Vanessa and I tell you it is a crowd pleaser!! Love it and you will too, I promise!! Just a side note ... it is my daughter's favorite, when I make it she always gives me a hug and thanks me, if that doesn't make you want to make this.. I don't know what will....

Italian Beef

3- 4 lbs. chuck roast                                                    1 Onion (Chopped)
2 pkgs. Good seasons Italian dressing mix                 1 ½ tsp garlic powder
2 cans Rotel diced tomatoes with green chili’s         a little salt & pepper
¼ cup water

Put chuck roast in crock pot and put all other ingredients in on top of chuck roast.  Put crock pot on low for 24 hrs.  If it is a smaller roast it may take only take 15 hours,  just keep checking on it. Stir roast until shredded.  Serve on buns or however you like.

Saturday, November 5, 2011

Cinnamon Roll Pancakes

I have made these and they are wonderful!! They are just perfect without the glaze, but if you have a sweet tooth be sure to make it!! This is a great Saturday morning or Sunday morning treat!

http://www.recipegirl.com/2011/03/01/cinnamon-roll-pancakes/

Cinnamon Roll Pancakes

An absolutely decadent morning treat...

Ingredients:

PANCAKES:
1 cup all-purpose flour
2 teaspoons baking powder
1/2 teaspoon salt
1 cup milk
1 Tablespoon canola oil
1 large egg, lightly beaten
CINNAMON FILLING:
1/2 cup butter, melted
3/4 cup brown sugar, packed
1 Tablespoon ground cinnamon
CREAM CHEESE GLAZE:
4 Tablespoons butter
2 ounces cream cheese
3/4 cup powdered sugar
1/2 teaspoon vanilla extract

Directions:

1. Prepare pancake batter: In a medium bowl, whisk together flour, baking powder and salt. Whisk in milk, oil and egg, just until batter is moistened (a few small lumps are fine).
2. In a medium bowl, mix butter, brown sugar and cinnamon. Scoop the filling into a small zip baggie and set aside. You don't want this to remain super-liquidy. It's best if it becomes a consistency similar to toothpaste.
3. In a medium, microwave-safe bowl- heat butter and cream cheese until melted. Whisk together until smooth; whisk in powdered sugar and vanilla extract; set aside.
4. Heat large skillet over medium-low heat. Spray with nonstick spray. Scoop about 3/4 cup batter onto the skillet. Snip the corner of your baggie of filling and squeeze a spiral of the filling onto the top of the pancake. When bubbles begin to appear on the surface, flip carefully with a thin spatula, and cook until browned on the underside, 1 to 2 minutes more. Transfer to a baking sheet or platter and keep in a warm oven until ready to serve.
5. When ready to serve, spoon warmed glaze onto the top of each pancake.

Tips:

*Keep the heat low or your pancakes might cook up too quickly. Don't flip them until you see those bubbles starting to pop on top. Flip them with a wide spatula so you can grasp the whole thing without batter and filling dripping all over the place!
*It's best if you pour the batter onto your skillet, wait a minute or so and then swirl the cinnamon onto the batter. That'll give it a chance to set a little before you add the swirl.
*If your baggie of filling begins to get too thick, just pop it in the microwave for a few seconds to soften it up again. On that same note, it shouldn't be too runny. The consistency of soft toothpaste is perfect. If it's melty and runny, it will tend to run all over your pancakes. Once you micro it, let it sit on the counter at room temp for a while until it thickens slightly.

Wednesday, November 2, 2011

You have to see this!!!

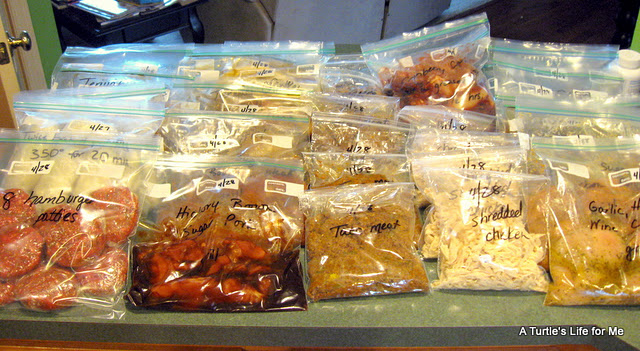
I wanted you all to see this article that has inspired me to do more freezer cooking.  I hope I stay inspired...just saying.  I think this is such a good idea especially with all of the busy days coming during the holidays, I think this would really help!! Please go to her site and read her thought process behind this. I found a lot of great tips!!

Football Food Freezer Cooking Frenzy

by Crystal on November 2, 2011

Remember when I posted about the gal who made 46 freezer meals in four hours for a total of $95? Well, not only did I get to meet this amazing woman at the Harrisburg Reader Meet-up, but she also told me that she’d recently posted about her Football Food Freezer Cooking Frenzy.
Head over and read how she made a bunch of Football Food for her Freezer in just a matter of a few hours. I promise you’ll be inspired!

Fall Leaf Collection Project for Kids!!!

     I was looking for a craft or something to do with my 8 yr old as well as my 3yr old and 1 yr old. I wanted to do something that involved the different types of leafs and tree's.  I stumbled across this today and I am going to try to do this tonight or tomorrow. I think it will be a lot of fun and it is something we can start to do for a fall tradition.  I hope you try it too!! Here is the link to nick jr's website.

Tuesday, November 1, 2011

M&M Holiday Pretzel Treats

I make these every year and they are addicting!! You will love them. You also can change them up season to season by changing the M&M's. I am using the fall ones right now.  Love it!!!!

Holiday Pretzel Treats

From FamilyFun Magazine
    Holiday Pretzel Treats

    Salty pretzels combine with sweet chocolate for these fun treats that make a yummy gift few can resist. (In fact, you may want to make some extras for yourself!)

    Ingredients

    • Bite-size, waffle-shaped pretzels
    • Hershey's Kiss or Hershey's Hug
    • M&M's candy

    Instructions
    1. Heat the oven to 170F. Set a number of bite-size, waffle-shaped pretzels (one for each treat) in a single layer on a cookie sheet lined with parchment paper, then top each pretzel with an unwrapped Hershey's Kiss or Hershey's Hug.
    2. Bake for 4 to 6 minutes (the white chocolate will melt more quickly), until the chocolates feel soft when touched with a wooden spoon. Remove the cookie sheet from the oven and quickly press an M&M's candy into the center of each Kiss.
    3. Allow the treats to cool for a few minutes, then place them in the refrigerator to set, about 10 minutes. Place handfuls of the candies in clear plastic bags and tie on colorful ribbons.

    Homemade Slime


    I found this recipe online and tried it out to see if it works and it did!  I am making this tonight with the kids.... should be fun!!!

     
    Homemade Slime aka GAK

    1 teaspoon borax powder
    1 1/2 C water, divided
    4 oz (1/2 C) Elmer’s glue, clear or white
    food coloring
    Add borax powder to 1 cup of water and stir to dissolve. Set aside. Pour glue into a medium mixing bowl and add 1/2 C water. Add a few drops of food coloring until desired color is reached and then stir to mix glue solution until smooth. Pour the borax mixture into the glue mixture and watch the solids start to form. Stir for a few moments and then use your hands to gather the mass. The mixture will be very soft and wet. Keep kneading until it firms up and feels dry. Discard excess liquid in bowl. The more you knead and play with the slime the firmer it will become. Store in a ziplock bag or air tight container and the slime will keep indefinitely.